The Dangers of Low-Quality Tactile Indicators
Blog
Cost saving at what cost?
With increasing economic pressures on projects in both the public and private realms, it’s natural that there are aims to reduce costs. These reductions can be sought in material procurement, reduction in project scope, or through other elements that are deemed non-vital.
The procurement of tactile ground surface indicators or tactile studs and strips is another category of material that doesn’t go untouched in the cost-cutting exercise. But what and who is impacted by buying cheaper, lower quality tactile indicators or looking at alternative materials for their construction?
The quality level of tactile indicator materials
It can be hard to quantify the quality level of tactile indicator materials through appearance alone, as there are multiple factors that go into making something of high or low quality. There are, however, objective features and measurements that we can rely on to determine the suitability of a type of material for a given purpose. These can include:
- The type of material and its inherent strengths and weaknesses
- Material thickness and whether it’s solid or hollow
- Fixing method type
- Tensile strength
- Impact resistance
- Any treatments or finishes
- Colour fastness
These facts and measurements can be used to weigh up and compare the quality of various materials against the scenario they’ll be installed in.
The types of tactile indicator material
Tactile indicators can be procured in a significant number of materials that, and as mentioned the quality of that material goes a long way in ensuring the longevity of that installation. The materials most used are:
- Aluminium
- Brass
- Bronze
- TPU (Thermoplastic polyurethane)
- PU (Polyurethane)
- Stainless Steel (303, 304, 316, 316L)
- Composite material (A combination of materials i.e., TPU and metal)
All these materials have their place in their make-up of tactile indicators, and they have their unique strengths and weaknesses. Each of these materials can be manufactured in such a way that they guarantee a set design life. A key component is matching the correct material to the right circumstances in which they’ll be installed.
This list below gives a brief overview of some of the pros and cons of these materials and things that should be considered in their use cases.
Aluminium
+ Great cold weather performance
+ Doesn’t rust
+ Reasonably hardwearing
+ Can be anodised in multiple colours for contrast
– Can corrode over time
– Not as strong as stainless steel
Suitable in the majority of scenarios in areas that don’t see chemical contaminants
Brass
+ Attractive finish
+ Doesn’t rust
+ Reasonably hardwearing
– Will patina over time without upkeep
– Not as strong as other metals like Aluminium and Stainless Steel
– Can corrode over time
Great for areas of historical or cultural merit
Generally, a solid choice and suitable for most scenarios
Bronze
+ Attractive finish
+ Doesn’t rust
+ Reasonably hardwearing
– Will patina over time without upkeep
– Not as strong as other metals like Aluminium and Stainless Steel
– Can corrode over time
– The most expensive option in the metal range
Great for areas of historical or cultural merit
Generally, a solid choice and suitable for most scenarios
TPU/PU
+ Available in multiple colours and highly customisable
+ Can be installed with adhesives
+ Cheaper alternative to metal
– More prone to breakage than their metal counterparts
– Installation isn’t as permanent as that of metal studs and strips
Fantastic as a temporary solution or areas where the flooring cannot be altered
Great for providing bright contrasting guidance indoors
SS 303, 304, 316 316L
+ The hardest wearing and strongest metal
+ Highly rust and corrosion resistant with varying levels depending on type with 316L being the most premium option
+ Requires little to no upkeep
– Not a vast amount of customisation of the metal finish
Ideal for every scenario due to those increased weatherproof and contamination proof credentials
Composite materials are excluded due to the sheer variance in properties depending on which materials are joined together.
Tactile indicator fixing methods
There are multiple methods through which tactile indicators can be affixed to the desired surfaces. These methods include:
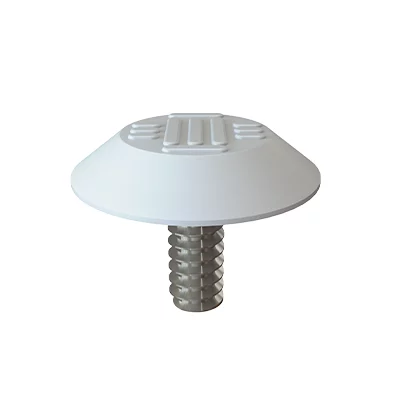
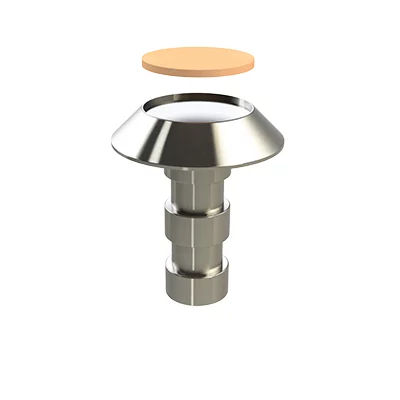
- Machined pin – A pin that’s machined from the same billet of metal that the stud head is manufactured from.
- Welded pin – A pin that’s manufactured separately from the head of the stud or strip and then welded in place
- Pressed pin – A pin that’s manufactured separately from the head of the stud or strip and then pressed into the tactile indicator
- Adhesive – An applied adhesive that sticks the stud or strip to a surface
- Screwhole – Holes through which a screw can be inserted to hold down the stud or strip
The strongest of installation fixing methods is the machined pin as the pin itself originates from the same metal as the rest of the stud. Second to machined pin is pressed pin in terms of strength with welded pin, screwhole and adhesive following in that respective order. Welded pin studs and strips face their own levels of complication due to welds being trickier and not as reliable on various metals like brass and bronze. Any method of joining multiple parts of a stud together, using a separate material, creates a point of weakness to varying degrees.
The manufactured form of tactile indicators
The question around longevity from the perspective of materials is around the form they’re manufactured to. Each component of tactile indicators like a stud or strip has a set length, width and height that they need to achieve to be compliant with whatever regulation that’s specific to that country or state. So, for example, in the UK corduroy warning strips need to be 400mm long, 20mm wide and 6mm in height.
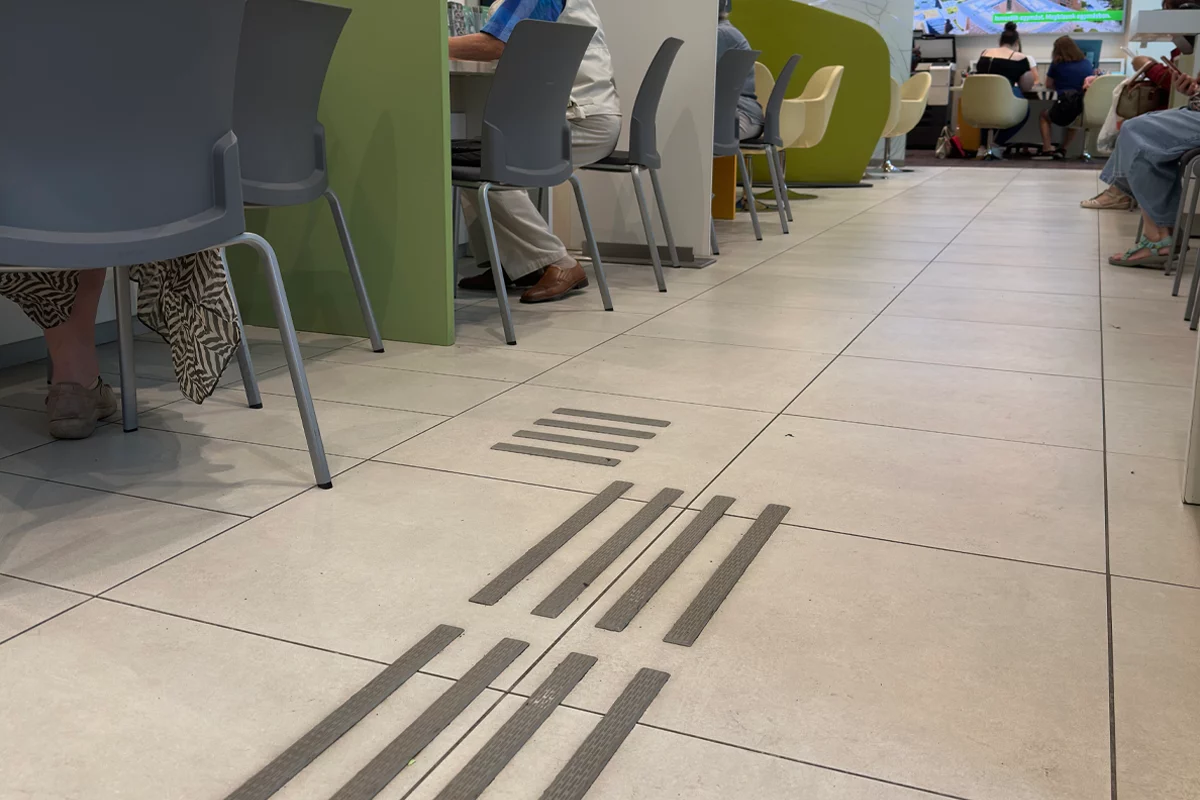
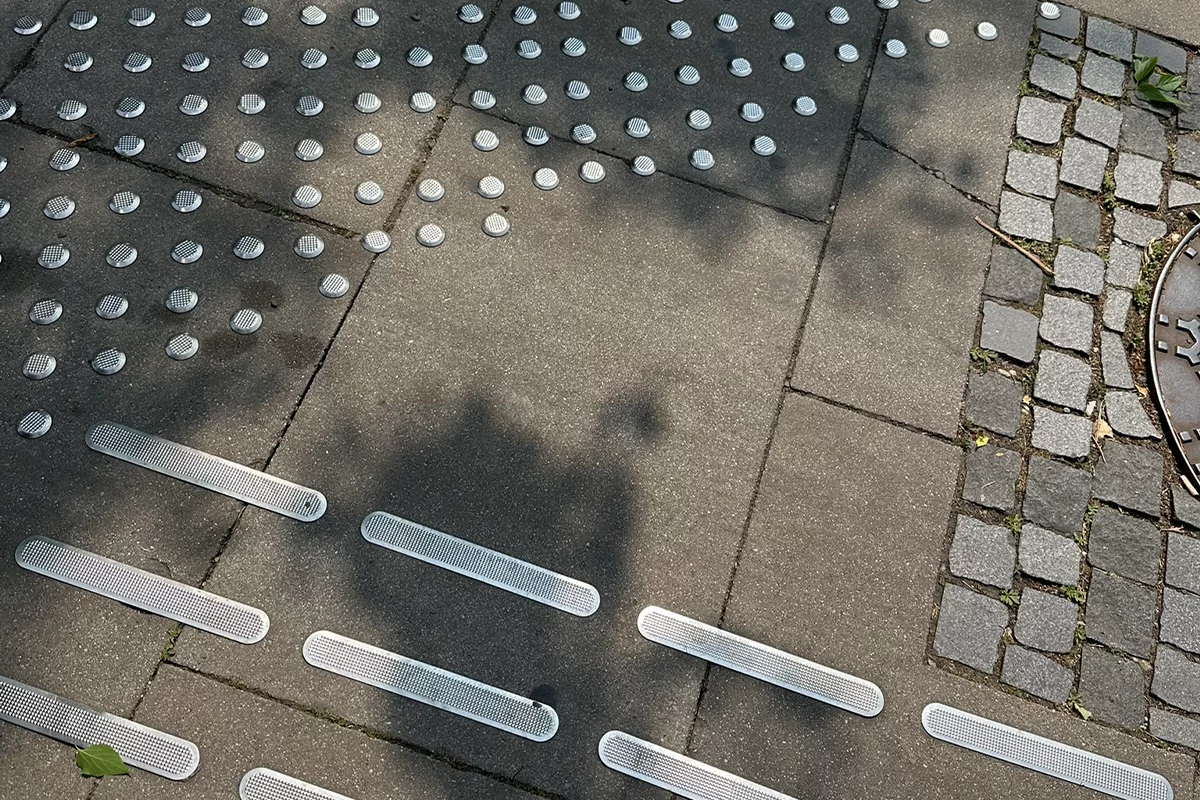
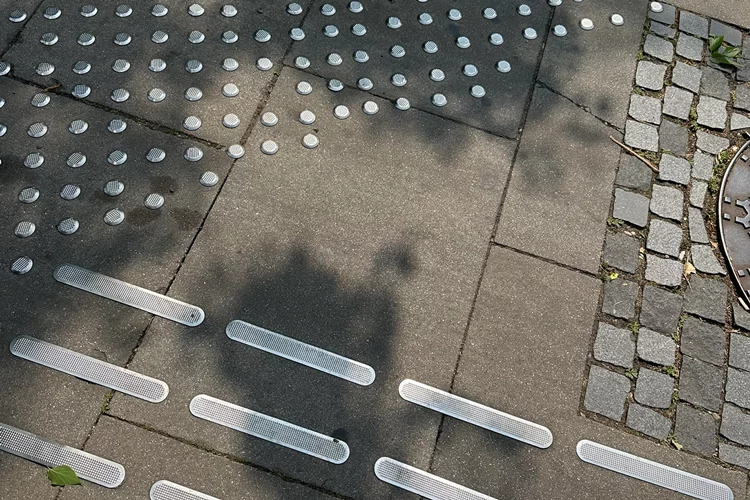
This dictates that the height would need to be 6mm and would lead anyone to conclude that the material would need to be 6mm thick. Except that increasingly in use around parts of Europe are hollow strips and studs. Technically they meet all the guidelines; they just have a hollow body. The issue with this comes from the fact that they aren’t as structurally sound as their non-hollowed counterparts, leading to issues shown in the image below.
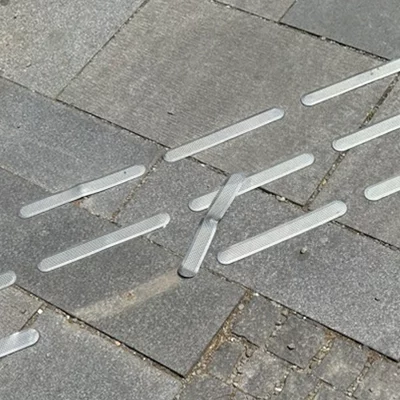
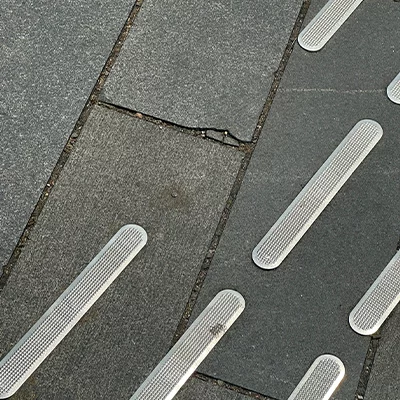
These types of studs and strips are manufactured from a Moulding process which leaves a hollow underneath. After that process is complete, a stud is then welded into the shell. The point of failure from this installation has arisen from a combination of the welded pin into the hollow shell and installation on an uneven surface with gaps under the strip. Visible on multiple strips is an impingement in the middle of the strips where the central fixing pin has come unstuck and raised up due to pressure on parts of the strip with gaps underneath. The foot traffic then caused the strip to fold into that fixing pin, almost like a circus tent.
There’s also evidence of further creasing where the gaps in the tiles have the strips bending into them due to the lack of tensile strength. This further causes the strips to contract and become unsafe.
Had the strips installed been solid, this issue would have never arisen and it’s likely that they wouldn’t have been removed even with the gaps in the tiling.
Composite vs Mono material tactile studs and strips
Another consideration when choosing a tactile indicator is whether to select a composite material that can be multicoloured and provide increased contrast or whether to opt for a standard all metal stud or strip. While composite tactile studs and strips enjoy their benefits over single material tactile indicators, they also come with a weakness. The weakness is dependent on the types of materials that are joined together, and which part of the stud’s anatomy are those separate materials.
There are two types of composite tactile indicators, one is where the actual composition of the stud structure is made up of two parts, for example the pin is metal, but the stud head is TPU. The other type of composite tactile indicator is where the surface has a hollow where an anti-slip, TPU or PVC surface can be stuck down with adhesive. The only type of composite tactile that can have questionable performance due to its nature as multi material is the former.
Wherever two materials are joined together, there is an inherent weakness over single or mono material tactile studs or strips. This weakness is due to the artificial bond that holds them together and depending on where that bond is it can present a risk to the longevity of the stud. There is a more than zero chance that under the right conditions a composite tactile indicator will fail, while under the same circumstances a mono material tactile indicator wouldn’t.
Who is affected by low-quality tactile indicators?
The truth is that everyone is affected by low quality tactile indicators. The general hazard of them coming loose is experienced by those that encounter them daily, like pedestrians, children, prams and buggies, wheelchair users and other mobility aid users. There are also less obvious consequences for those involved in the initial project or installation. However, the most affected are the visually impaired that rely on them to make their way through both public and private spaces. As part or multiple parts of the route they may be used to have now come away making the tactiles illegible.
What are the consequences of low-quality tactile indicators?
The consequences of low-quality tactile indicators for the public including those aforementioned path or walkway users are that when these tactiles come loose they then present a trip hazard. This is particularly the case for mobility aid users, the elderly, and those with visual impairments. If they become crumpled like in the example given above, they can also present a sharp edge that could cause damage to children and anyone that trips onto them or over them.
When removed entirely leaving a partial guidance path, corduroy hazard warning or blister layout, the tactile signal becomes increasingly harder to read for the visually impaired that rely on them. This may in turn cause either hesitation for the visually impaired user causing them to slow down in a flow of foot traffic or alternatively cause them to feel a false sense of confidence in places where they should stop. Both scenarios cause a hazard for those that are visually impaired, general pedestrians, and road users.
Maintaining a consistent tactile route or warning layout is vital to ensure the safety of those that are visually impaired. The best way to think of it is like going on a long drive to somewhere unfamiliar and having your Satnav turn off for twenty minutes of the journey. You’d be completely lost having relied on this method of navigation to reach your intended destination. The same can be said when guidance routes are incomplete, patched together, or assembled using substandard tactical indicators.
The aim is to install something that is fit for purpose and that will last the intended lifetime of the project or location. Ideally, tactile indicators should require very little in the way of maintenance, retaining both their tactility and visibility throughout their service.
These combined effects can leave project owners and clients liable and can even damage the reputation of those that specified, procured, and installed them.
The financial consequences of low-quality tactile indicators
Although it can be enticing to snap up a deal for cheaper tactile indicators, as with every purchase, there can be tradeoffs in both performance and quality. Although initially they may cost what seems like a relatively small amount, the repeated installation of the same tactiles will add up over time. Especially when the cost of labor, materials, and replacement tactiles are combined over multiple months are years. Then upgrading the installation to tactile indicators of a better quality requires redoing the whole installation at increased cost and disrupting the surface even more. This upgrade can even include resurfacing the area to ensure the tactile indicators can be reliably installed.
The saying goes that ‘if you buy cheap, you buy twice’ and that’s certainly the case for tactile indicators. Sometimes the best cost savings are in getting the right tool for the job and installing the best tactile indicator for the scenario.
Is there room for cheaper tactile indicators?
All of this isn’t to say that there isn’t room for cheaper alternatives to the more traditional tactile indicators; it’s just important to understand their limitations and use cases. For something that vulnerable people rely so heavily upon, it’s important to get it right. Where an installation is temporary or is going to be heavily monitored for these kinds of defects, a cheaper alternative can sometimes be the right call.
What does a good quality tactile indicator look like?
A good quality tactile indicator can be a very subjective thing; it depends on multiple factors like:
- Where are they going to be installed?
- What sort of footfall will they see?
- Will vehicles drive over them?
- What is the underlying surface?
- How much can the surface be modified?
- Are they permanent or temporary?
- What weather conditions will they be under?
There are a large number of variables that can determine whether a tactile indicator is suitable or not, for any given situation.
This is a list of our top 10 tips when looking to specify or procure tactile indicators:
- TPU or PU tactile indicators are best used indoors
- Self-adhesive tactile indicators should be used indoor only, with the knowledge that their adhesive will fail over time
- Tactile indicators that are installed using applied adhesive should be installed indoors and edge sealed against water ingress for the best results
- For outdoor installations solid metal tactile studs and strips are often the best option
- Solid metal tactile studs with machined pins are the most reliable studs
- Solid metal tactile strips with pressed pins are the most reliable strips
- Along with metal pin tactile studs and strips, drilling and apply epoxy resin is the most reliable method of installation for lifelong performance
- Screw hole tactile studs and strips are ideal for use on wooden surfaces, particularly if a security screw is used
- For the best weathering metal choose stainless steel, 316L in particular
- Brass and bronze tactile indicators are great for areas of historic merit or listed buildings as they are generally considered in keeping with the surrounding aesthetic
Bonus tip
- Get a sample of the products if possible and compare them
In summary, there are many reputable brands that sell great quality tactile indicators, and with tactile indicators of all kinds being a form of safety equipment, the key focus should be on their quality. It’s understandable that in times of economic turmoil everyone’s looking to their budgets and being asked to justify them, but when it comes down to low-quality tactile indicators, everyone pays.
If you need assistance picking the right tactile indicator for the job email us at [email protected] or telephone 01686 807450